Metering With Your Camera... |
Metering Modes in Digital SLR's
Many digital cameras today offer a variety of metering modes. Below is a brief explanation of some the most popular ones. Multi-zone Metering: This setting divides the subject (viewfinder image) into a matrix of metering zones that are each read, evaluated, and then averaged out to provide good exposure results for most subjects. This type of metering is also called "Matrix Metering" and/or "Evaluative Metering". Center-Weight Average Metering: This type of metering also averages out the light reflected off the subjects, but gives extra "weight" or "attention" to the center of the frame. This is a good option when shooting portraits or when your main subject is positioned in the middle of the frame. Spot Metering: With this option, the meter reads the reflected light only from the selected auto-focus points, or from the center of the frame. |
Meters and Exposure
Most SLR (Single Lens Reflex) cameras are equipped with a meter. The meter allows the photographer to read or measure the amount of light passing through the lens. When you use your camera in the Manual (M) Mode, you must know how to use the meter. With the aid of the light meter, the photographer can then determine which settings will allow the correct amount of light through the lens. There are differences among camera meters, but they all accomplish the same thing: to read the amount of light passing through the lens.
It is important to note that all built-in camera exposure meters read reflected light. Reflected light does not produce accurate exposure readings in a variety of situations. This is addressed in detail in the paragraphs below. (The most accurate exposure meters are hand held meters which are able to read incident light, which is the light directly falling on the subject.)
The camera meter takes into account the reflected light of the subject as it passes through the camera. In this way, it helps to adjust both the aperture and shutter in order to provide a correct exposure. Equivalent light entering the camera can be obtained with many different f-stop/ shutter speed combinations. Since they both adjust light in 100% or 50% intervals, when a specific f-stop is changed, we can maintain the same amount of light by simply moving the shutter the opposite way.
Understanding Exposure
Controlling the amount of light that enters the camera and exposes the film is an essential part of recording the image. In photography, light is managed by the following: ISO, aperture, shutter, and ultimately the meter, that puts all of the information together.
There are two basic methods of measuring light: reflected light and incident light
Built in through the lens camera meters (TTL) read only reflected light. Reflected light can easily fool the meter depending on the scene as the camera meter will read the light that is reflecting off the subject and not the actual light which is falling on the subject. Camera meters are not designed to handle high contrast situations or strong directional lighting, for example, they measure light in a non-specific way and thus exposure results are often inaccurate. There are some cases, however, where camera meters or reflected light meters are the obvious choice for measuring the light such as a distant landscape scene, or street photography with moving subjects. A hand held reflected light meter will provide the best results when taken from the camera position, directly in line with the lens’ point of view.
Camera exposure meters are calibrated to presume 18% reflectance or neutral gray. This allows meters to render correct readings for average (18% reflected) subjects in “average” situations. Thus if a meter reading is taken off a white surface, such as snow, (or a white dish as per our tests), the exposure will result in an exposure that puts the snow (dish) at 18% gray. The same situation occurs when a reading is taken off a black surface - the meter, attempting to “make” the dish gray, will result in an overexposed black.
When using built-in meters, it is important to learn how to recognize possible ways it may be fooled and how to override the settings. One example would be when taking a picture that includes a person under an umbrella standing on a sunny beach. The camera meter, which will read the reflected light off the scene, will most likely underexpose the person under the umbrella. One way of solving this lighting situation is to do the following:
- walk up to the person and take a reflected meter reading with your camera
- note the settings the camera is indicating
- walk back to re-compose the scene, and use the settings obtained in step #2 when you take the photograph; then close-down 1/2 stop, then a full stop, and take the photo again. (Bracketing will avoid extreme over-exposure in the background.)
However, the best way to control this type of situation is to use a fill-flash. When using a flash, take the camera meter reading from the sunny background. (Let’s say it’s f11@1/250). Adjust the shutter so that it can synchronize with your flash, but still provides the same exposure, (e.g.: f22@1/60), and use the camera reading as your settings with the flash. This will ensure even light under the umbrella and in the background. To avoid harshness from the flash on the person’s face, use a soft box or diffuser on your flash. (The same technique applies when the subject is backlit by a window.)
Understanding how TTL meters work can also help the photographer bracket a scene to achieve more desirable results. For example, when photographing a white dog in the snow, if the photographer knows that the meter is going to “make” the white “gray”, then he/she can bracket and overexpose by 1/2 stop, and 1 stop. Of course, the best option is still to use a gray card!
Built in Matrix Meters measure specific areas of light reflecting off the subject. They read different segments of the subject which are compared and evaluated. These are most useful when the camera is set on “Automatic”. They often provide an exposure setting which is a bit closer to what a reading off a gray card would be, but they can easily be fooled depending on the areas they are comparing. Most digital SLRs made today have built in Matrix meters which the photographer can adjust to read different areas of the subject within the viewfinder.
Incident light meters measure the light falling on the meter itself, (or on the subject, when used correctly). Thus, they will not be fooled by contrasting surfaces of different densities. When used properly, these meters will give the photographer the most accurate and consistent exposure results.
Incident measurement is taken from the subject position. When using incident meters, hold the meter in front of the subject with the hemisphere pointing towards the camera. An incident meter is always a good complement to the camera meter. With these types of meters, subjects that appear lighter than gray will appear lighter and v.s. Colors will be rendered accurately and highlight/shadow areas will fall naturally into place. A hand held meter permits the photographer to read specific area of the subject allowing for a more accurate reading and desirable exposure.
Understanding meters is critical to obtaining successful exposures. Always remember that exposure meters are mechanically reading the light. In other words, they can’t do the thinking for the photographer, and certainly can’t interpret the subject as a photographer can.
Many cameras today offer a feature called "Exposure Compensation Mode" this is typically seen as a +/- symbol in the back or top of the camera body. The exposure compensation mode allows you to adjust the exposure suggested by the camera meter. (+) lightens the exposure of the image; (-) darkens the exposure. (Usually the camera Menu option will allow you to set the compensation to 1/2 or 1/3 stop intervals.
Why use a gray card?
When reflected light reading is taken off a gray card, the meter will indicate settings which will be much more accurate than the reflected reading off the subject.
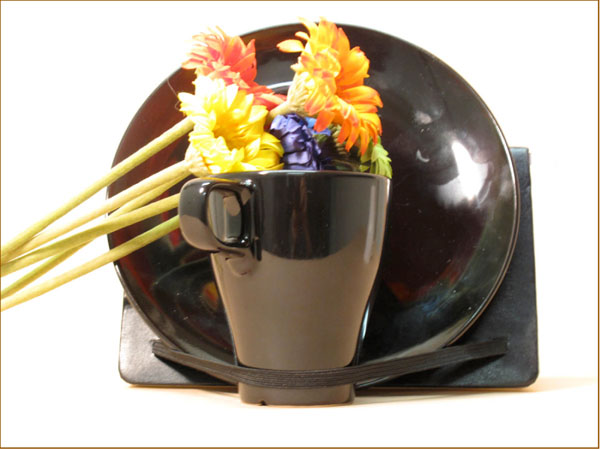
The camera meter has been used here without a gray card. Notice how when it reads off the black subject, it "grays" the black.
|
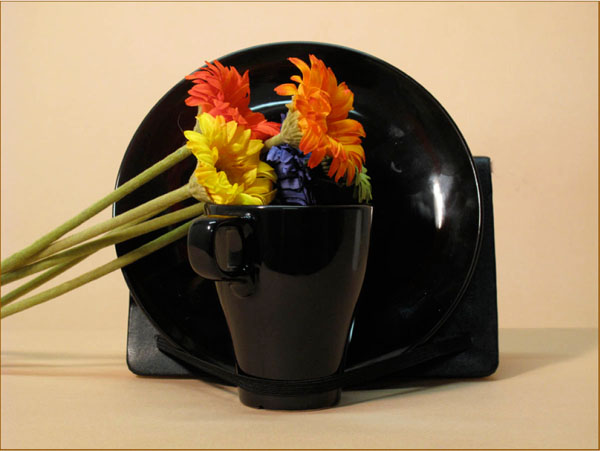
Here a gray card was used. The proper exposure has been achieved and the black dish and cup, actually look "black", as they should.
|
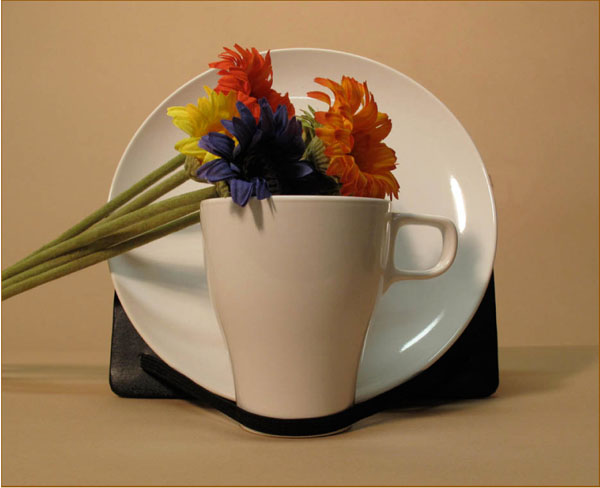
The camera meter has been used here without a gray card. Notice how when it reads off the white subject, it "grays" the whites.
|
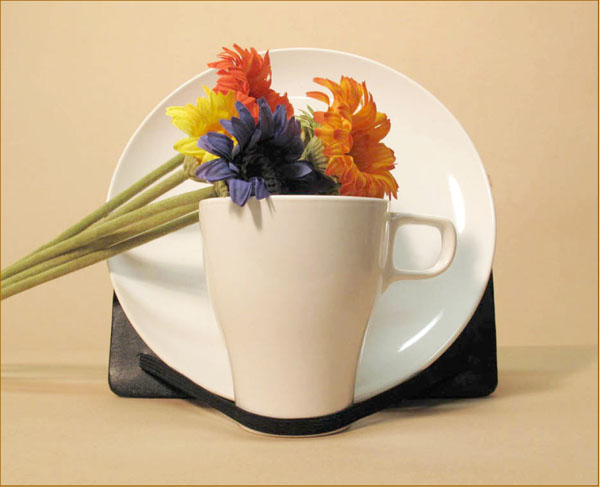
Here a gray card was used. The proper exposure has been achieved and the whites look as they should.
|
